Garden State has enhanced the Email function in New MLS. Below is a step-by-step explanation of how to use the new Email.
The enhanced email screen displays in two columns.
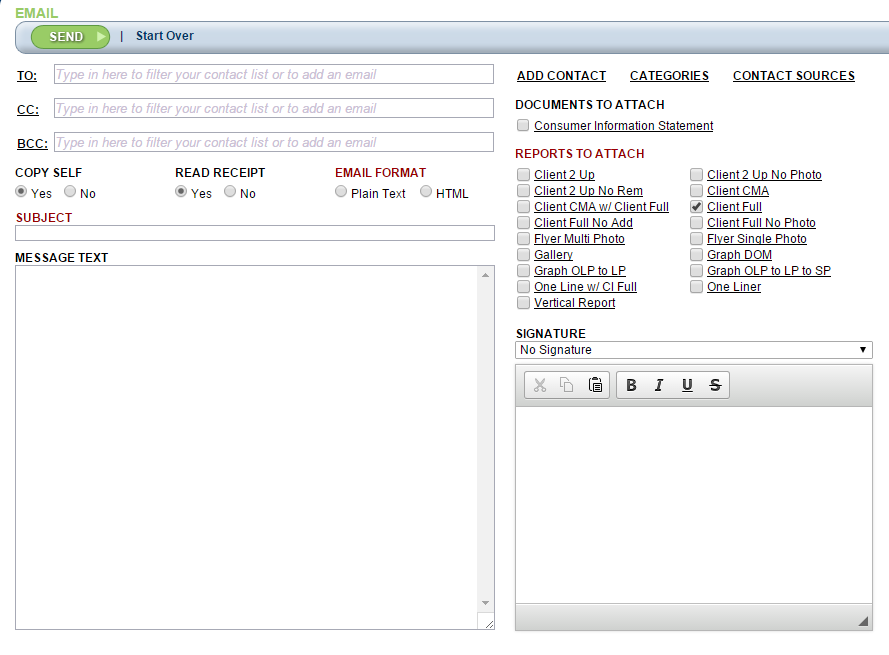
Column 1: a search box for filtering your Contact recipients; options for the filters Copy to (CC), Blind copy to (BCC), Categories, and Contact Sources; options for Copying the email to yourself, for requesting a Receipt indicating the email has been picked up, and for selecting the type of Email Format you would like to use; as well as text boxes for entering the email Subject and the Message Text.
Column 2: the ability to: Add new contacts; filter contacts by Category; filter contacts by Contact Sources; and design a Signature.
*******************************************************************************************************************************************************
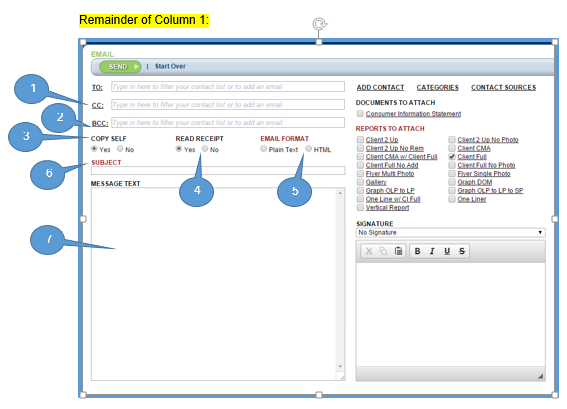
COLUMN 1:
TO: 
- In other words, type in your Contact's name. As you type, suggestions will appear based on the letters you have entered so far.
- A popup window will display.

Below is a "Key" to the functions of the popup window.
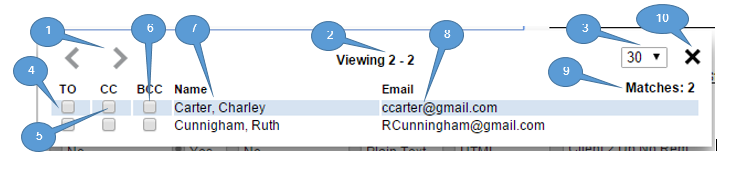
- Use the left < and right > chevrons to scroll through your Contact list.
- Viewing n- nn indicates that you are viewing a particular Contact (n) from the total number of Contacts (nn)
- The dropdown box with the down arrow allows you to choose how many Contacts you want to view at a time.
- Check the TO box to send the email(s) to this Contact.
- Check the CC box to include this Contact as a
- COPY TO Contact.
- Check the BCC box include this Contact in the send to email, but suppress the contact's name (Blind Copy) so no sender or recipient can see it.
- The Name box displays the Contact's name.
- The Email box displays the Contact's email address.
- Matches: n displays the number of matches returned from all Contacts by the characters you entered in the search box up top.
- Click on the X to close the popup box
*******************************************************************************************************************************************************
- CC: Follow the same procedures as above for TO:
- BCC: Follow the same procedures as above for TO:
- COPY SELF? Check Yes if you would like a copy of this email to be sent to you.
- READ RECEIPT: Check Yes if you would like to receive a receipt that your email has been picked up by the recipient. (Note: not all ISP's support this function, so not receiving a Read Receipt is not a guarantee that the email has not been picked up.)
- EMAIL FORMAT:
- Check Plain Text if you would like your email to appear to the recipient without graphics, etc.
- Check HTML if you would like your email to appear to the recipient with graphics, etc.
- SUBJECT: Enter the subject of the email.
- MESSAGE TEXT:
- Enter the message that you would like to have appear in the email.
- You may type as long a message as you like, but only the first 1400 characters will be stored in email history.
- When you type in the 1401st character, the following message will appear: You have entered more than 1400 characters in the Message Text of your email. The entire Message Text will be sent to your client; however only the first 1400 characters will be saved under your contact's history.
*******************************************************************************************************************************************************
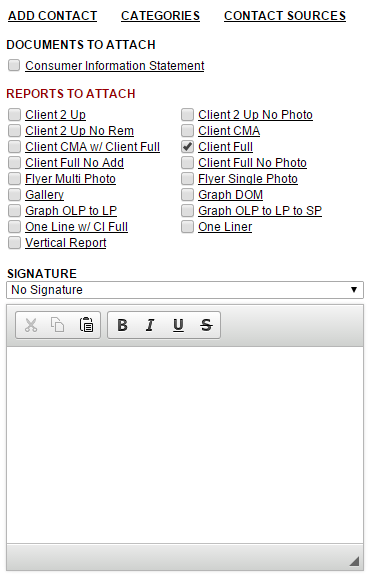
COLUMN 2:
*******************************************************************************************************************************************************
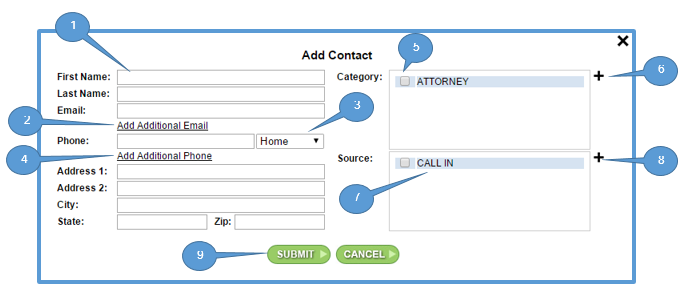
- ADD CONTACT: This section allows the agent to create a new Contact to add to their Contact database.
- Enter whatever information you want to include in the Contact's profile. You must enter at least First Name: and Last Name: .
- Click on Add Additional Email to include emails other than the primary one.
- Click on Home dropdown to change the designation of the phone number (from Home to Office, for example).
- Click on Add Additional Phone to include phone numbers other that the primary one.
- Click on a Category(ies) to filter your list of contacts to include only contacts with that Category in his/her profile.
- Click on the plus sign (+) to add a new Category.
- Click on a Source(s) to filter your list of contacts to include only contacts with that Source in his/her profile.
- Click on the plus sign (+) to add a new Source.
- To add this new Contact to your Contact database, click on the Submit button when you are done.
*******************************************************************************************************************************************************
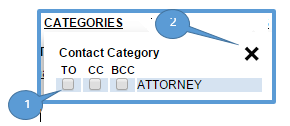
- CATEGORIES:
- This section contains a list of Categories that you created in your Contacts function. For example: Attorneys or Family.
- Categories act as filters for limiting the email recipients only to those Contacts whom you have designated in their profiles as belonging to that Category. For instance, if you included Family as a Category, clicking next to Family in the checkbox under TO would cause those recipients who are designated as Family in their Contact profile to be recipients of this email.
- Check the appropriate box next to each Category:. TO: for standard emailing, usually to the primary recipient; CC: to Copy someone; and BCC: to Blind Copy someone (i.e., the recipient will not know that this person also was emailed).
- When done, click on the SUBMIT button.
- Your Category choices will appear in the second line of Column 2.
*******************************************************************************************************************************************************
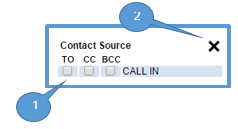
- CONTACT SOURCES:
- This section contains a list of Contact Sources that you created in your Contacts function. For example: Walk-ins.
- Contact Sources act as filters for limiting the email recipients only to those Contacts whom you have designated in theirs profiles as belonging to that Contact Source. For instance, if you included Walk-ins as a Source, clicking next to Walk-ins in the checkbox under TO would cause those recipients who are designated as Walk-ins in their Contact profile to be recipients of this email.
- Check the appropriate box next to each Contact Source: TO: for standard emailing, usually to the primary recipient; CC: to Copy someone; and BCC: to Blind Copy someone (i.e., the recipient will not know that this person also was emailed).
- When done. click on the X in the upper right-hand corner.
- Your Contact Source choices will appear in the third line of Column 2.
*******************************************************************************************************************************************************
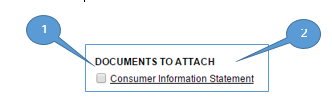
- DOCUMENTS TO ATTACH:
- This section contains a list of documents that you may want to attach to your email.
- To attach a document, click in the checkbox next to its name.
- To view the Consumer Information Statement, click on its name. Note that your computer must have the ability to view .pdf files.
- This section contains a list of documents that you may want to attach to your email.
*******************************************************************************************************************************************************
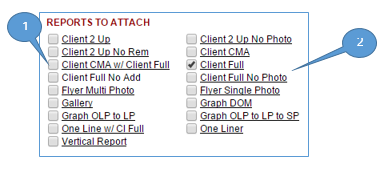
- REPORTS TO ATTACH:
- Check the boxes next to the reports you would like to have included in the email.
- Click on a Report Name to preview any particular report.
*******************************************************************************************************************************************************
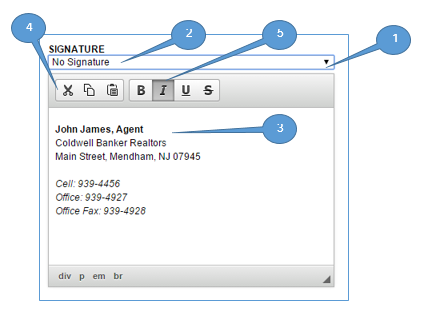
- SIGNATURE:
- If you have set up a Signature(s) in Menubar > Resources > Edit My Profile > Signature, it/they will appear in the dropdown field under the SIGNATURE text box, and you may select one of them.
- If you do not want to include a signature, click on the dropdown field and select No Signature.
- If you have not set up a signature, you may create one here. (Note: this signature will not be saved in your profile; you have to go to Resources>Edit My Profile in the menubar to create and save a default Signature.)
- Creating a Signature:
- Create a Signature that you would like to have attached to this particular email.
- In the large text box, enter Signature information as you would like it to appear in this email. For instance, your name, designations, office, phone numbers, etc.
- You may cut part of signature, paste from another source, or copy from the signature to the clipboard.
- Font the information as you prefer, using B for bold, I for italics, U for underline, and
Sfor strike-through. - Click on the SEND button in the Toolbar to send the email.
